6 Steps for Training a Kitten or Cat to Use the Litter Box – and What to Avoid
Litter box training is one of the most critical parts of getting your new kitten or cat off to a good start in your home. It’s important for obvious reasons – a cat that isn’t using the litter box is doing its business somewhere else in the house.
This article will walk you through how to set up a litter box properly, a 6-step process for how to train your cat to use the litter box, and highlight some things to avoid along the way.

Do cats automatically use a litter box?
Some do, but you absolutely should not assume yours will. Some cats pick up litter box use very quickly while others take some work, trouble-shooting, and patience. Following the steps in this guide will greatly increase your odds for success.
The best way to do this is to be ready with everything you need, where you need it, before you bring your cat home for the first time. Problem prevention is golden.
But if you’re reading this because you’re already having litter box troubles with your cat, it’s definitely not too late to right the ship! Many of the things outlined below are relevant for you as well.
Make Sure the Problem Isn’t Urine Marking
It’s worth pointing out here that sometimes people mistake urine marking (or spraying) as a litter box use problem.
If your issue is urine marking, then you have a cat (usually male) sensing a territorial threat and spraying drops of urine on vertical surfaces in order to mark their territory.
A cat not using the litter box, on the other hand, is leaving puddles of pee on horizontal surfaces. This issue is often due to one of the following:
- a litter box that isn’t clean enough (some cats are very picky)
- not enough litter boxes in a multi-cat home
- a medical issue causing pain when urinating
- feeling too vulnerable using the box where it’s located
If your problem is that your cat has begun peeing or pooping outside the litter box, the issue usually resolves itself by identifying and addressing one of the above problems.
When is the right time to start litter box training kittens?
Kittens are ready to begin litter training around the 4-week-old mark. Until this time, their mama does the clean up for them. You can start out kittens of this age with a very shallow box with litter about an inch deep.
If you’re starting with a kitten or cat older than 4 months, you should begin litter box training as soon as you bring them home. And you will need to have everything already in place before that big first day.
My own experience litter training kittens
When I fostered a litter of tiny kittens, I started them with a cardboard box that I cut down low with a box cutter so that the walls of the box were just a couple of inches high. I then lined it with plastic and placed it on a plastic storage container lid to contain moisture and spilled litter.
After a couple of weeks, I began using an actual kitten litter tray. But I made the mistake of buying trays that were probably too big for them, and there were some accidents as a result that might have been avoided. So I could have done things a little better!
What size should the litter box be for kittens?
Cats need a tray or box that is about 150% (one and a half times) the length of their body. As kittens grow, so should the litter tray. So if you start with a very small kitten, you’ll need to replace their tray with a bigger tray a few times as the kitten gets bigger.
Using the right size for your kitten, with walls low enough for them to step over, is important for them to develop consistent litter box habits. Don’t start too big like I did!
Affiliate Disclosure: VerveCat is supported by readers. As a member of Amazon Associates and other affiliate programs, we may earn a commission at no added cost to you when you follow a product link and make a purchase.
Choose a litter box
Many cats prefer to be able to see their surroundings while they are doing their business – if they can’t, they may not feel safe.
Early litter training success is more likely if you use an open tray without a top on it. You can start with something basic, like this one.
If you think you will prefer one with a top, you can get one with a detachable lid, like this one, and experiment with putting the top on to see if your cat minds it, but not until your cat has been using the tray reliably for a while without it.
You could also try having one box with a lid and one without, and see if your cat shows a strong preference.
What if you want a nicer or different litter box?
Once you’ve learned about your cat’s preferences, and your own, you can think about getting a different type of litter box if you want something fancy or something that prevents tracking better, for example. But in the beginning, stick with the basics to make sure you get your cat’s routine dialed in first.
And if you do upgrade your litter boxes, be sure to read up on how to do that the right way, lest you end up undoing your cat’s impeccable litter box habits.
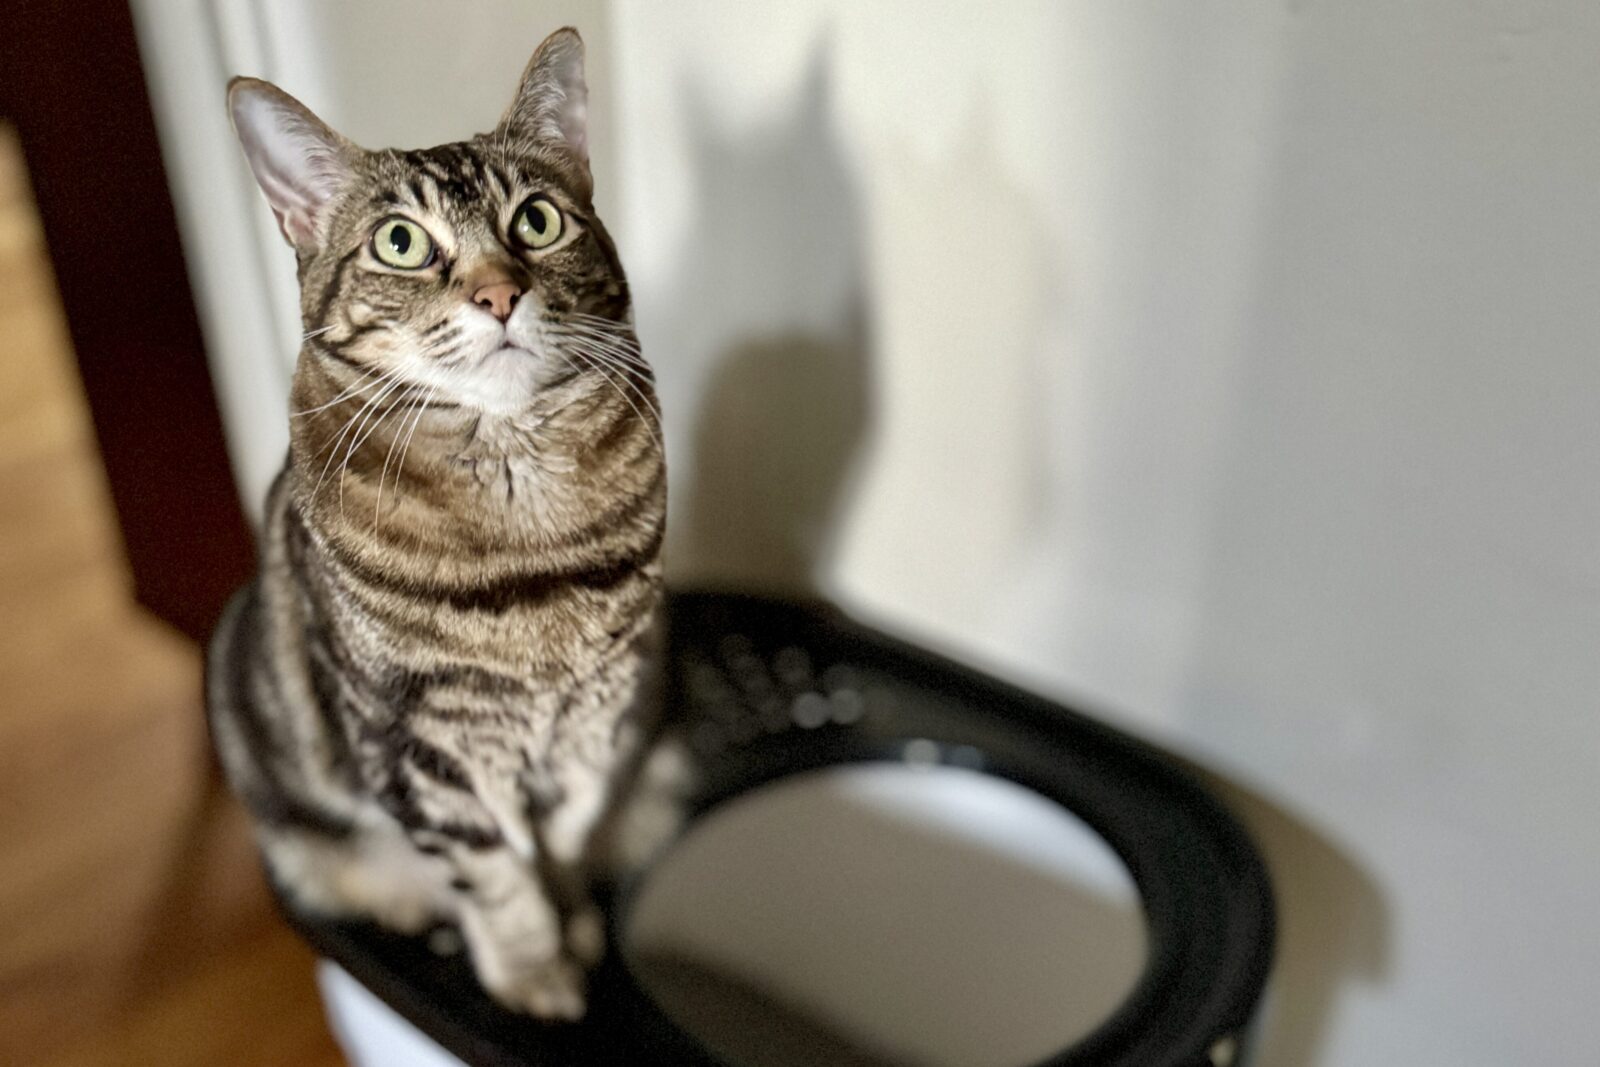
I have settled on top-entry litter boxes because Gandalf is a very high-peer, meaning he’s one of those cats that shoots his stream over the top of the wall of front-entry boxes.
I currently use these and really like them:
Iris Round Top Entry Litter box and Scoop (Amazon)
Cheaper version of the Iris Top Entry w/Scoop (Amazon)
If you’re trying to fit a litter box into a narrow space, you might try a non-rectangular box, like this one (Litter Genie). I used it for a while to wedge into a narrow spot between the wall and the toilet. It was great but the handles did break after a little more than a year’s worth of use.
How many litter boxes do you need?
As a general rule, a home should have at least one more litter box than there are cats. It may seem excessive, but there’s good reason for this.
Cats are territorial by nature, and providing options helps ensure a cat doesn’t avoid using the litter box altogether. With one cat, having two boxes helps prevent avoidance issues that are due to high sensitivity to litter that is soiled.
So if you have one cat, you should have two boxes. For two cats – three litter boxes. And so on. hoping it works out with fewer litter boxes invites litter box avoidance problems, and you really don’t want that.
It is also a good idea to have at least one litter box for each floor of your home. We’ll talk more about litter box placement in a minute.
Get some cat litter
Cats’ preferences for litter tend to fall into three categories: preference for clumping litter, preference for non-clumping litter, or no strong preference for one over the other. Most cats seem to prefer fine-grain litters. And some cats tend to reject corn and wheat-based litters, perhaps because they smell too much like food.
It is worth some experimentation to figure out what litter type your cat likes the best. If they seem to be fine with both clumping and non-clumping, then you can use the one you prefer the most.
When it comes to your own preference for litter, the big factors will probably be:
- Your cat uses it consistently
- Odor control
- How much a litter tracks throughout your home
- How dusty it is
- How easy it is to scoop
- How easy it is when cleaning the litter tray
In my experience, it’s hard to find a litter that accomplishes all of those things well. I used World’s Best multi-cat clumping litter (corn-based) for many years, and loved it for odor control and ease of scooping and cleaning. But the dust and tracking were really bad.
Recently, I switched to Dr. Elsey’s Ultra Unscented clumping clay litter, and my cats made the transition instantly. I’ve found the tracking and dust to be much better, but it doesn’t do quite as well with odor control. In the end, the decreased tracking has me sticking with it. And the fact that it’s a lot cheaper than World’s Best doesn’t hurt either.
Litter box placement
To start out, I strongly recommend that you acclimate your cat to your home properly. This means gradually, rather than letting them have access to everywhere all at once (which can be very stressful). To do this, you need to set up an initial “new cat sanctuary” room that you can keep closed during the initial adjustment period.
Be sure to read the article for details on how to set up that designated space in order to properly acclimate your new cat. For this article, we’ll keep things focused on the litter box part.
Using a designated, contained space at first is not only important for proper acclimation and adjustment to your home, it’s also critical for litter training.
If you allow your cat access to your entire home, you may have no idea where they’re going to the bathroom! Starting out that way is a recipe for a lot of “accidents” and will probably make litter box training take much longer than necessary.
Of course, your litter boxes will be in the designated space/room you set up. Place the litter boxes near each other. This is a good way to run your initial experiments to figure out if your cat has a strong preference for litter type.
If you do that experiment with boxes in different parts of your home, then you don’t know if your cat isn’t using a box because of the location or because of the kind of litter.
If you eventually want to have the litter boxes located somewhere else in your home, move one at a time, leaving one in its original spot until you know your cat is using the other one in its new location.
Each litter box should be placed where it is easily accessible but not too busy with commotion or a lot of people traffic. Across the several apartments and homes I’ve lived in, I’ve found that a mudroom or laundry room tends to work the best if you’re lucky enough to have either of those.
Once your cat is using the litter box reliably, you can place litter boxes permanently in separate locations. Ideally you’ll have one on each floor of your home.
How clean should I keep the litter boxes?
Many cats will refuse to use a litter box once it gets beyond a certain level of stink factor or dirtiness. You should manage to avoid finding out where that point is for your cat as long as you scoop the box every day.
Also, deep clean each box every couple of weeks by emptying it, washing it out, and filling it with fresh litter to a depth of around 2-3 inches.
6-Step Litter Box Training
So you’ve got your two litter boxes (or more if you have more than one cat – see above) set up in a designated acclimation space, and you’ve just brought your new cat home. You’re ready for your first litter box training session.
1. First, put your cat in the designated room, and simply let them explore. Remember, everything will be new and overwhelming, so be patient and don’t force anything. The cat may not be ready to explore right away, and that’s fine. Let them show their readiness on their own terms.
2. If your cat is exploring, but hasn’t discovered the litter box on their own after a few minutes, gently set them near it. Let them smell it and check it out. They may get in and use it.
This step (Step #2) is also where you will start if you are starting litter training with a 4-week-old kitten.
3. If the cat doesn’t get in the litter box, gently set them in. Comb your fingers through the litter a few times to imitate the motion of digging. It’s ok if the cat hops out right away. Don’t force them to stay in the box.
4. You will be repeating Steps #2 and #3 many times over the course of the first few days or weeks until your cat is using the litter automatically, so be patient. Do these steps after your cat finishes each meal, when your cat wakes up from a nap, and after a play session.
5. When the cat uses the litter box, reinforce this behavior by rewarding them right away (more on this in the next section).
6. Keep the litter boxes clean and fresh during the training process. Scoop the litter after every use of the box so that you don’t risk having the cat avoid using it because it’s soiled. Once you have litter box use on autopilot, you can switch to scooping once each day.
Next, we talk about how to use positive reinforcement in training your cat.
Using positive reinforcement for the behaviors you want to see
Positive reinforcement involves rewarding your cat when it behaves in ways that are desired or acceptable. This can be in the form of praise, affection, or treats. All of these are types of positive attention your cat probably likes. A cat just adopted from the shelter might not be ready for physical affection yet, so treats and praise is where you should start.
Positive reinforcement training only works when the reward happens immediately following appropriate use of the litter box. This means giving your cat a treat as soon as they’ve hopped out of the box.
By using rewards immediately after desired behaviors, your cat will realize that when they do certain things (e.g., use the litter box or scratch the scratching post), they will receive something good. They form a positive association with using the litter box.
Why you shouldn’t use punishment
It’s important to avoid using punishment as part of your cat training strategy. Why? Two reasons:
- Punishment doesn’t work because cats don’t understand your human reasoning, and will thus be no less likely to pee outside the litter box next time.
- Not only does punishment not work to change a cat’s unwanted behavior, but what it will do is teach your cat that you are unpredictable and not always a safe person to be around. Punishment damages the bond you have with your cat.
If no punishment, then how should I react when there are accidents?
Of course it’s going to be upsetting if you see your cat peeing on your rug, but it’s important to react calmly to accidents. Your cat isn’t being naughty and doesn’t “know better.”
Don’t yell, don’t be rough, don’t scold, don’t squirt them with water, don’t force them to stay in the litter box. Again, punishment can only serve to harm your bond with your cat, and it doesn’t work.
Instead, gently place your cat in the litter box. It might just hop right back out. That’s ok. You’re going to be spending a lot of time in the beginning just being with your cat in the designated space.
When you see your cat use the litter box, you’re going to reward that behavior right away. And if you notice signs that they’re about to go to the bathroom away from the litter box, you can gently set them in the box and demonstrate the pawing motion by scratching the litter with your fingers.
What you want to avoid is setting them in the box forcefully or angrily, which could be frightening and cause them to avoid the litter box – the exact opposite of what you’re trying to accomplish. You don’t want them to associate the litter box with anything bad.
Treat pee accident spots with an enzymatic cleaner so that the lingering smell doesn’t inspire your cat to use the same spot again in the future.
How long does it take to litter train a kitten or cat?
For kittens transitioning from mom taking care of things to using a litter box, some will catch on very quickly. Though they may have a few accidents still in the beginning.
Others will require repeated training sessions, and may take as long as three or four weeks to finally get the routine down.
For older kittens and adult cats who aren’t familiar with litter boxes yet, many will catch on quickly. But some will require repeated training sessions and need up to several weeks to make litter box use automatic.
Be patient and stick to the training steps and methods outlined above.
What if your cat isn’t using the litter box despite training?
If you’ve used the above steps consistently, it’s been over 4 weeks, and your cat still isn’t using the litter box, it’s time to check in with your veterinarian. They will help you trouble-shoot. Sometimes the problem can be due to a medical issue that needs to be addressed.
Same goes if your litter-trained cat suddenly stops using the litter box.
Last Meows
Most cats are easily trained to use a litter box. Following the steps and methods outlined in this article will increase your odds of success further still.
In contrast, when litter box training is not done carefully and methodically, it is easy to end up with a problem on your hands that could have been avoided.
Be sure to get everything you need in place before bringing a new cat home, acclimate your cat slowly, use positive reinforcement training sessions, keep the boxes clean, and avoid using punishment in reaction to any accidents. Consistency and patience are key.
Frequently Asked Questions (FAQ)
Q: How do I change the kind or brand of litter I’m using?
There are a couple of ways to change the litter type successfully.
1. The first method is to gradually mix in larger and larger amounts of the new stuff with the old stuff. Start with mostly old with a bit of new, and work your way up to mostly new with a bit of old. After a few weeks, you should be ready to completely switch over.
2. The other method involves side-by-side boxes, one with the new litter, and one with the old. Your cat may begin using the new stuff without any fuss. If that’s the case, you can take away the old litter once you’re sure your cat is using the new litter reliably. If your cat never starts using the new litter, you may need to use the first method instead.
When I switched with my cats a couple of years ago, I used the mixing approach and was able to switch very quickly with no issues. That was from corn-based clumping to clay-based clumping.
If you are making a switch to a litter type that is drastically different than the one you’ve been using, the process may take longer and need more gradual adjustments.
Just remember to monitor your cat’s use closely during the transition and after you’ve switched over.
Q: Can changing brand or kind of litter make a cat sick?
A small number of cats and cats with asthma may be sensitive to breathing in dust particles from some lightweight and silica-containing clumping litters. Consult your veterinarian if you suspect your cat is reacting to the litter you’re using.
Q: How much litter to put in a litter box?
Most cats do great with litter between about 2 and 3 inches deep. If you have an overzealous digger or a high-peer (like my cat, Gandalf on both counts), you may need to explore high-walled litter boxes.
If you use litter that’s too deep, you may end up with litter getting kicked out onto the floor. You want to avoid that because when your cat finds litter outside the litter box, it could be a temptation to pee on that litter instead of in the litter box.

About VerveCat
VerveCat.com launched in Fall 2023 and aims to grow into a comprehensive source of information, resources, and reviews for every part of feline companionship.
Whether you’re an experienced cat owner or just getting started on your cat life journey, we’re glad you stopped by and hope you’ll find things here to help you along the way.
Read more about the VerveCat project and the sentient beings behind it on our About Page.